
What is Texas Trash Dip?
Origins of the Recipe
Texas Trash Dip is an iconic party dish that has become synonymous with comfort food in the southern United States. The recipe originated as a hearty, sharable snack ideal for gatherings, particularly in Texas, where bold flavors and rich, satisfying dishes are celebrated. Its name might raise a few eyebrows, but the term “trash” humorously reflects its seemingly hodge-podge combination of ingredients that come together in a surprisingly delicious way.
Popularity of Texas Trash Dip in Parties and Gatherings
This dip has gained nationwide popularity due to its simplicity and adaptability. Whether served during game days, potlucks, or casual family get-togethers, Texas Trash Dip is known to disappear quickly, leaving guests clamoring for more. Its creamy, cheesy base combined with flavorful add-ins like beans, sour cream, and jalapeños makes it a standout option for any menu. The layered presentation and ability to pair it with chips, bread, or veggies enhance its versatility, making it a must-try for hosts and food enthusiasts.
What Makes It Unique?
What sets Texas Trash Dip apart is its flexibility. You can tweak the ingredients to suit dietary preferences, spice levels, and personal tastes. Unlike traditional dips, this one embraces the “everything but the kitchen sink” approach, encouraging cooks to get creative with their additions. The baked component ensures a warm, gooey texture that keeps guests coming back for more. Moreover, the bold mix of Tex-Mex flavors gives it a distinct identity, rooted in rich, comforting tradition.
Ingredients for Texas Trash Dip
Essential Ingredients
The foundation of a perfect Texas Trash Dip lies in its core ingredients. Most recipes start with a creamy base made from cream cheese and sour cream, which provides the signature smooth texture. Refried beans are a must-have, adding depth and heartiness to the dish. To enhance the flavor profile, shredded cheese—commonly cheddar, Monterey Jack, or a Tex-Mex blend—is incorporated both in the layers and as a melted topping. Ground beef or sausage is often added for extra protein, making the dip a meal in itself.
Spices such as chili powder, cumin, garlic powder, and onion powder are key to infusing the dip with its Tex-Mex flair. Diced green chilies or jalapeños introduce a touch of heat, while sliced black olives or green onions serve as garnish for an added layer of flavor and visual appeal. These essentials ensure a rich and flavorful base that can be adapted to suit individual tastes.
Optional Add-Ins for Personalization
One of the most exciting aspects of Texas Trash Dip is its flexibility. You can elevate the recipe by incorporating optional ingredients. For a spicy kick, consider adding diced habaneros, hot sauce, or even chipotle peppers in adobo. If you’re looking for a vegetarian twist, swap the meat for cooked lentils or crumbled plant-based proteins. Corn, diced tomatoes, or roasted bell peppers can add texture and sweetness, while a sprinkle of fresh cilantro or lime juice adds a refreshing burst of flavor.
To cater to health-conscious guests, consider using low-fat or non-dairy alternatives for the cream cheese, sour cream, and cheese. Gluten-free versions of refried beans and seasonings ensure the dish remains inclusive for those with dietary restrictions.
Where to Source High-Quality Ingredients
The quality of ingredients can make or break the dip’s overall flavor. Whenever possible, opt for fresh and organic produce, such as locally sourced jalapeños and onions. Premium-grade cheeses that melt evenly, such as sharp cheddar or creamy queso fresco, can elevate the dish’s texture. High-quality refried beans—whether homemade or canned—will provide a richer, more authentic taste. For meat options, lean ground beef or seasoned sausage from trusted butchers can enhance the protein layer.
Pro tip: Many specialty grocery stores offer Tex-Mex seasoning blends that can save time and add authenticity to your dip.
Step-by-Step Guide to Making Texas Trash Dip
Preparing the Ingredients
The first step in creating the perfect Texas Trash Dip is gathering and prepping your ingredients. Start by softening the cream cheese to ensure it blends seamlessly with the other components. This can be done by letting it sit at room temperature for about 30 minutes or microwaving it in short bursts. Next, cook and crumble the ground beef or sausage in a skillet over medium heat, draining any excess grease to prevent the dip from becoming overly oily.
If you’re using canned refried beans, give them a quick stir to loosen the texture. Freshly shredding your cheese, rather than using pre-packaged shredded cheese, is highly recommended. Pre-shredded varieties often contain anti-caking agents that can prevent smooth melting. Dice any fresh vegetables, such as green chilies or onions, and set them aside for layering later.

Mixing and Layering Techniques
Once the ingredients are prepped, it’s time to assemble the dip. Begin by combining the softened cream cheese, sour cream, and refried beans in a large mixing bowl. Use a hand mixer or whisk to create a smooth, creamy base. Season this mixture with Tex-Mex spices like cumin, chili powder, and garlic powder for that classic bold flavor.
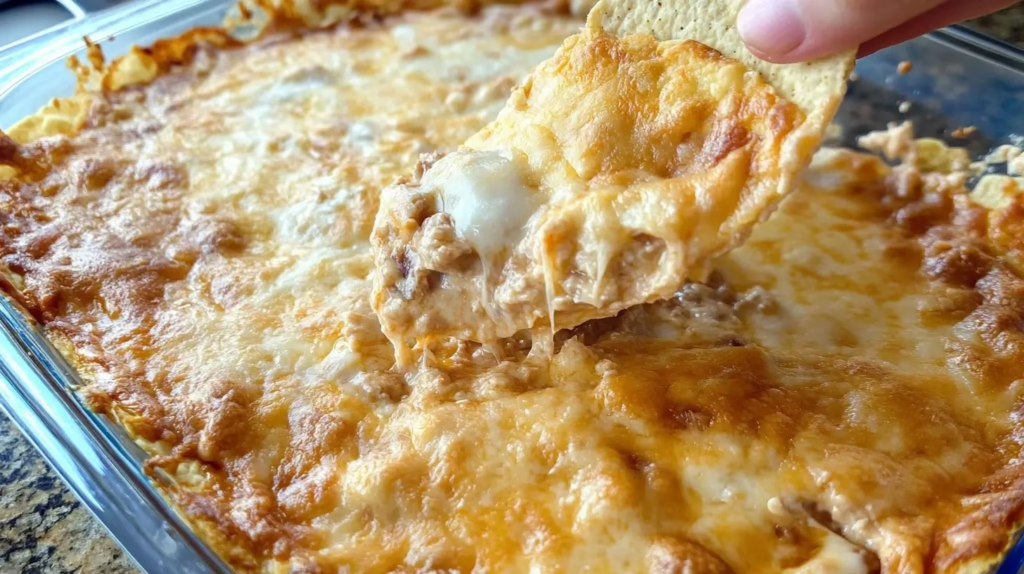
In your baking dish (a 9×13-inch pan works well), spread the creamy base evenly across the bottom. Next, layer on the cooked ground beef or sausage, followed by a generous sprinkle of shredded cheese. Add any additional toppings, such as diced tomatoes, jalapeños, or green chilies, as desired. Repeat the layering process if using a deeper dish, ensuring the top layer is finished with a thick layer of shredded cheese for the ultimate gooey topping.
Baking for the Perfect Texture and Flavor
Preheat your oven to 350°F (175°C). Cover the assembled dip with aluminum foil to prevent the cheese from browning too quickly. Bake the dish for approximately 20–25 minutes, or until the cheese is fully melted and bubbling around the edges. For an extra golden crust, remove the foil in the last 5 minutes of baking and switch to broil mode, keeping a close eye to avoid burning.
Once out of the oven, let the dip cool for 5 minutes to allow the layers to settle. Garnish with freshly chopped cilantro, green onions, or sliced black olives for added texture and presentation.
Equipment You’ll Need
Essential Kitchen Tools
Creating the perfect Texas Trash Dip requires a few basic kitchen tools, many of which you likely already have on hand. A large mixing bowl is essential for blending the creamy base of cream cheese, sour cream, and refried beans. A sturdy spatula or wooden spoon works best for combining the ingredients without leaving any clumps.
A non-stick skillet is necessary for cooking ground beef or sausage evenly. If you’re using a vegetarian protein alternative, the skillet can also be used to brown and season the substitute for a rich, meaty flavor. Additionally, a cheese grater is a must-have for shredding fresh cheese, which is key to achieving a smooth, melty texture.
For the baking process, you’ll need a 9×13-inch baking dish. Glass or ceramic dishes are ideal because they distribute heat evenly and help the dip retain warmth after it’s removed from the oven. A small whisk or handheld mixer is also helpful for blending the cream cheese mixture quickly and efficiently.
Recommended Baking Dishes for Even Cooking
The choice of baking dish can impact how evenly the dip cooks. A deep, heavy-duty ceramic or glass dish works best for this recipe, as it provides excellent heat retention and ensures that the cheese melts uniformly. If you plan to serve the dip directly from the oven, a visually appealing casserole dish or stoneware pan is a great option that doubles as a serving dish.
For those looking to serve smaller portions or create variations of the dip (like a spicier version), you can use individual ramekins or mini cast iron skillets. These smaller dishes are perfect for customizing portions and look charming when served at parties.
Tips for Cleanup
While Texas Trash Dip is undeniably delicious, cleaning up after can be a challenge due to the baked-on cheese and sauces. To make cleanup easier, consider greasing your baking dish lightly with cooking spray or lining it with aluminum foil before assembling the dip. If you’re using a skillet for cooking meat, choose one with a non-stick surface to minimize food residue.
Soaking your baking dish in warm, soapy water immediately after serving can help loosen any hardened bits, making scrubbing much easier. For tough, stuck-on cheese, a soft sponge with a bit of baking soda can work wonders without scratching your dish.
Variations of Texas Trash Dip
Vegetarian and Vegan Adaptations
For those who follow a plant-based diet, Texas Trash Dip can be easily adapted without losing its signature flavor. Replace the ground beef or sausage with crumbled tofu, lentils, or a plant-based meat substitute. You can also add extra beans, such as black beans or kidney beans, to boost the protein content.
For a vegan version, swap the cream cheese and sour cream for non-dairy alternatives like cashew cream or vegan cream cheese. Many brands offer vegan shredded cheese that melts beautifully, ensuring you still achieve the gooey, cheesy texture that makes this dish so beloved. Don’t forget to double-check that the refried beans are vegan, as some canned varieties may include lard.
Spicy Versions for Heat Lovers
If you enjoy a fiery kick, there are plenty of ways to turn up the heat in your Texas Trash Dip. Start by incorporating diced jalapeños or serrano peppers into the base layer. For a smokier flavor, add chopped chipotle peppers in adobo sauce. A few dashes of your favorite hot sauce or cayenne pepper can also amp up the spice level.
For an extra bold twist, use pepper jack cheese or a spicy cheddar blend as your cheese base. Garnishing with sliced fresh chili peppers or a sprinkle of crushed red pepper flakes can add visual appeal while signaling the spicy flavor to guests.
Low-Calorie Alternatives
To make Texas Trash Dip a little lighter without compromising on flavor, you can substitute some of the higher-fat ingredients. Opt for reduced-fat cream cheese, sour cream, and shredded cheese. Greek yogurt can be used in place of sour cream for a tangy, protein-rich alternative.
For a healthier protein option, use lean ground turkey instead of beef or sausage. You can also skip the meat altogether and focus on incorporating plenty of vegetables, such as diced bell peppers, onions, and corn, to create a lighter version of the dip. Finally, serve the dip with fresh vegetable sticks instead of chips to cut back on calories while still offering a satisfying crunch.

Common Mistakes to Avoid When Making Texas Trash Dip
Overcooking or Undercooking the Dip
One of the most frequent mistakes when making Texas Trash Dip is not paying attention to cooking times. Overcooking the dip can cause the cheese to become overly browned or rubbery, while undercooking it leaves the layers unevenly heated and the cheese insufficiently melted. To avoid this, stick to the recommended baking time of 20–25 minutes at 350°F, and check the dip periodically to ensure it’s bubbling and evenly heated. Using aluminum foil during baking helps prevent the cheese from browning too quickly, and removing it for the last 5 minutes allows the top layer to become perfectly golden.
Using the Wrong Cheese Combinations
Cheese is one of the stars of Texas Trash Dip, and using the wrong type can ruin the texture or flavor. Pre-shredded cheese, while convenient, often contains anti-caking agents that prevent smooth melting. Opt for freshly grated cheese, such as cheddar, Monterey Jack, or a Tex-Mex blend, to achieve a creamy, gooey consistency. Avoid overly hard or crumbly cheeses like Parmesan or feta, as they don’t melt well and won’t complement the dip’s bold flavors.
For those looking to experiment, mixing a spicy cheese like pepper jack with a milder option like mozzarella creates a dynamic flavor profile while ensuring a smooth melt.
Skipping Key Seasonings
Another common error is neglecting to properly season the layers of the dip. Each layer—whether it’s the creamy base, the meat, or the beans—should be seasoned to enhance the overall taste. Failing to add enough spices like chili powder, cumin, or garlic can result in a bland dip. Always taste and adjust the seasoning of each component before assembling the dish. Additionally, incorporating fresh ingredients like diced onions, garlic, or cilantro can add depth and prevent the dip from tasting one-dimensional.
Serving the Dip at the Wrong Temperature
Timing is crucial when serving Texas Trash Dip. Serving it straight out of the oven without letting it cool slightly can make it too hot to enjoy, while letting it sit too long causes it to cool and lose its creamy texture. Aim to serve the dip warm, and consider placing it in a warming tray or slow cooker if it will be out for an extended period. This ensures it stays gooey and delicious throughout your event.
FAQs About Texas Trash Dip
Can It Be Made Ahead of Time?
Yes, Texas Trash Dip can be made ahead of time, making it an excellent choice for parties or events where you want to minimize last-minute cooking. To prepare the dip in advance, assemble all the layers in your baking dish but hold off on baking it. Cover the dish tightly with plastic wrap or aluminum foil and store it in the refrigerator for up to 24 hours.
When it’s time to serve, remove the dish from the refrigerator and allow it to come to room temperature for about 20 minutes before baking. Then, follow the standard baking instructions, adding an extra 5 minutes if needed to ensure the dip is heated evenly.
Is It Gluten-Free?
Texas Trash Dip can easily be made gluten-free with a few simple adjustments. Most of the core ingredients, such as cream cheese, sour cream, and refried beans, are naturally gluten-free. However, it’s essential to check labels, as some store-bought versions of these ingredients might contain gluten. For example, certain spice blends or canned beans may have hidden gluten in additives.
If you’re serving the dip with tortilla chips or crackers, make sure to choose certified gluten-free options. By paying attention to these details, you can create a version of the dip that’s safe and enjoyable for guests with gluten sensitivities or celiac disease.
Can It Be Frozen?
Yes, Texas Trash Dip can be frozen, but there are a few things to keep in mind. The creamy components, such as cream cheese and sour cream, may experience slight texture changes when thawed. However, if stored properly, the dip can still taste delicious after freezing.
To freeze the dip, assemble it in a freezer-safe dish and wrap it tightly with plastic wrap and aluminum foil to prevent freezer burn. It can be stored in the freezer for up to 2 months. To reheat, thaw the dip in the refrigerator overnight and follow the standard baking instructions. If the texture seems off after reheating, a quick stir can help restore its creamy consistency.
Conclusion
Texas Trash Dip is the ultimate crowd-pleaser, bringing bold flavors, creamy textures, and irresistible gooeyness to the table. Whether you’re hosting a casual game day party, a festive family gathering, or a relaxed potluck, this dish is guaranteed to be a standout hit. Its versatility allows you to cater to various dietary preferences, from vegetarian and gluten-free adaptations to spicy or low-calorie versions, making it an ideal addition to any menu.
Beyond its flavor, the ease of preparation and ability to make it ahead of time ensure that you can focus on enjoying the event rather than being stuck in the kitchen. The warm, layered presentation paired with tortilla chips, fresh veggies, or creative alternatives ensures a visually appealing and delicious offering. Even leftovers—if you’re fortunate enough to have any—can be savored with minimal effort, thanks to simple reheating and storage techniques.
So, whether you’re a seasoned cook or a beginner looking to impress, Texas Trash Dip is a fail-proof recipe that brings everyone together. Its rich Tex-Mex flavors and customizable approach ensure that this dip will become a staple at your gatherings for years to come. Try it once, and you’ll understand why it’s a beloved favorite across homes and parties alike.